- Author Maria Gibbs [email protected].
- Public 2023-12-16 03:05.
- Last modified 2025-01-22 17:47.
The operating instructions for four-stroke mopeds recommend adjusting the clearances upon reaching the first 1000 km of run, and then every 4000 km of run. In addition, it is necessary to carry out the adjustment when extraneous noise appears in the engine after disassembling the cylinder head or replacing the timing chain.

It is necessary
- - a set of probes;
- - a set of spanners and socket heads;
- - pliers and tubular wrench.
Instructions
Step 1
Cool the engine completely. If the valve clearances are adjusted after the engine has been repaired, align the valves on the removed engine. In engines with a gas distribution mechanism of the SOHC type, the clearances are adjusted by screws located at the ends of the rocker arms.
Step 2
Unscrew the cover nuts on a scooter type motor or the threaded hatch in the cylinder head on an engine with a gearbox. Set the valves to the top dead center of the end of the compression stroke. To do this, find the special marks on the timing chain sprocket and on the cylinder head.
Step 3
When turning the crankshaft of the power unit, align these marks. Rotate the crankshaft with a pipe wrench put on the generator rotor nut. To get to this nut with a large screwdriver, unscrew the plug on the generator cover (on moped motors) or dismantle the fan housing (on scooter motors). Unscrew the spark plug first.
Step 4
Rotate the crankshaft until the timing marks on the cylinder head and on the sprocket are completely aligned. Check that the valves are set to the top dead center position. To do this, swing the crankshaft to the sides. In this case, the rocker arms of the valves must remain stationary and have a small play (free play). Use flat feelers to set the exact values of the thermal clearances.
Step 5
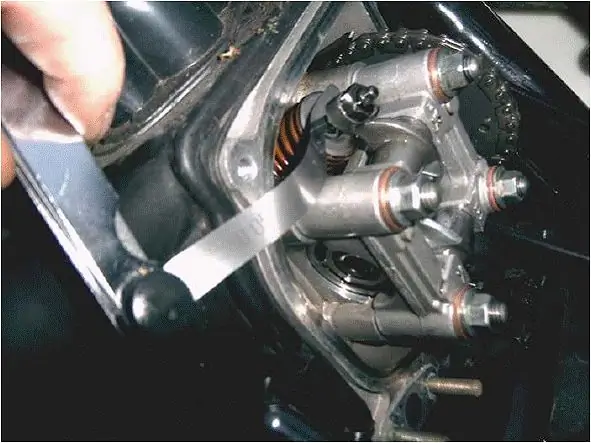
Insert probes of different thickness alternately into the gap between the valve end and the adjusting screw installed on the rocker arm. Bend the probes as necessary. If the stylus enters the gap with little force, and the next largest stylus does not enter this gap, consider the gap size equal to the thickness of the first stylus. Most 50cc engines cm, the clearances should be 0.05 mm, unless otherwise indicated in the instruction manual.
Step 6
Hold the screw head with a wrench or pliers to resize the gap. Loosen the lock nut at the same time. After inserting the desired dipstick into the gap, turn the adjusting screw until the dipstick is slightly pinched. Then, while holding the dipstick in place, tighten the locknut. At the same time, secure the adjusting screw against displacement with pliers or a wrench.
Step 7
After that, be sure to check the correctness of the installation of the thermal gap. Install all previously removed parts in reverse order.


